I have been thinking about writing a guide for a while now, but I came across this guide. It has everything you could possibly want to know about CoC. It even shows you how all of the different troops tend to path and explains why they path the way they do.
So what are you waiting for? Check it out.
Flammy's Strategy Guide
Showing posts with label Tips and Tricks. Show all posts
Showing posts with label Tips and Tricks. Show all posts
Wednesday, August 6, 2014
Friday, August 1, 2014
Raiding
There are different purposes for raiding. the main reason for raiding is of course to acquire resources. You can also raid to do gain trophies to move up in leagues. The purpose of this article is to help you create an army that will get the resources you want.
Resource Location
One of the most important parts of raiding is understanding where the resources are. Here is a chart that shows where to find your resources and how much you can get from them.
As you can see the highest level of loot is from the collectors, which fortunately for the raider are usually located outside of the village walls. The first thing you need to do is to see if there are any resources located in the collectors. I have created an article labelled Identifying Abandoned Villages to aid you in this endeavor.
Tips and Tricks
Goblin Raid
Composition: 100% goblins or 8 to 10 wall-breakers and the rest goblins.
When to use: Use a goblin raid if you only care about resources. Add wall-breakers if you want to go deeper into the base to attempt to get dark elixir.
Positive: Cheap and quick. The goblin army will rarely net you a loss in resources and the speed in which you can make goblins means you can constantly be attacking.
Negative: It is very rare that you will gain trophies on a goblin raid. The goblins will skip normal buildings in their thirst for resources.
How to attack: Dump goblins in groups of 15-20 around the perimeter of the base. If you are trying for dark elixir wait until they are about to go after a wall before dropping your wall-breakers.
Barch Raid (preferred attack strategy until Gold 2)
Composition: 30% barbarians and 70% archers, add wall-breakers for dark elixir
When to use: Use Barch Raids to get a high amount of resources and a good chance of earning a small amount of trophies.
Positive: Cheap and quick. The barch raid will rarely yield a loss in either resources or trophies in the lower to mid levels. The barch army is also a quick army to build.
Negative: When you reach Gold 1 and above it will become increasingly difficult to gain trophies on raids.
How to attack: Draw a line of barbarians across one of the edges of the village. Select the archers and draw the same line. Continue this all the way around the base.
Archer Raid (preferred attack strategy for Gold 1 and up)
Composition: 100% archers
When to use: Use archer raids when you want a high percentage resource yield with an almost guaranteed chance of getting trophies.
Positive: Cheap and quick. Although the archer raid is double the cost of a goblin raid it is still a very cheap army to create and it can be created in a short amount of time. You are also almost guaranteed trophies on your attack.
Negative: Costs more than the barch or goblin raid and takes longer to create.
How to attack: Draw a line of archers across one of the edges of the village. Continue this all the way around the base. Reinforce areas that need it.
Traditional Raid (preferred attack strategy for getting dark elixir or trophies)
Composition: 15 giants, 1 healer, 8 wall-breakers, 10 wizards, 15 barbarians, 20 archers and 20 goblins
When to use: Use this raid only when you need to go deep inside a base for dark elixir.
Positive: This base has the potential of clearing a village but usually it is used to get deep inside a base to get to the dark elixir storage.
Negative: Can cost up to 100k elixir to create. Also takes a lot of time to cook wizards and healer.It will probably limit you to 1 attack per hour.
How to attack: Use your barbarians to pull CC troops if they are present. Try to aim your giants at an air defense so you can get your healer down as soon as possible. Once you have a few giants down start putting down wall-breakers and more giants. After they have penetrated a bit start unleashing your barbarians and archers while keeping to lead your giants through with the wall-breakers. Once the dark elixir storage area is reached unleash the goblins.
Resource Location
One of the most important parts of raiding is understanding where the resources are. Here is a chart that shows where to find your resources and how much you can get from them.
| Building Type | Gold/Elixir | Dark Elixir |
|---|---|---|
| Town Hall | You can steal 100% of the loot for a max of 1000 | Not available |
| Storage | You can steal 20% - 2% per TH level past 5, Cap is 200k plus 50k for every level past TH5 | You can steal 6% - 1% per TH level past 8, Cap is 2000 plus 500 for every level past TH8 |
| Collectors/Mines | You can steal 50%, Cap is the storage capacity | You can steal 75%, Cap is the storage capacity |
| Clan Castle | You can steal 10% - 1% per TH level past TH5, Cap is the storage capacity of the Clan Castle | You can steal 7% - 1% per TH level past TH8, Cap is the storage capacity of the Clan Castle |
As you can see the highest level of loot is from the collectors, which fortunately for the raider are usually located outside of the village walls. The first thing you need to do is to see if there are any resources located in the collectors. I have created an article labelled Identifying Abandoned Villages to aid you in this endeavor.
Tips and Tricks
- Check town hall placement first. If it is a farming base with a town hall in a corner attack it but use only 4 troops unless it is also an abandoned village.
- Check the amount of resources that can be looted and make sure it is an abandoned village. If not move on.
- Don't worry about the amount of gold it takes to find the right base to attack. In the law of averages you will gain a lot more than you spend if you just keep searching for the right base.
- Don't use all of your troops if you don't need them. If you get your resources and go over 50% of the village destroyed there is no need to drop any more troops.
- Don't use spells when you are farming for resources unless you think you will gain more than you are spending by a lot.
- Start off your attack by hitting the corners. Sometimes they will give you the added percentage you need to get a few trophies.
Goblin Raid
Composition: 100% goblins or 8 to 10 wall-breakers and the rest goblins.
When to use: Use a goblin raid if you only care about resources. Add wall-breakers if you want to go deeper into the base to attempt to get dark elixir.
Positive: Cheap and quick. The goblin army will rarely net you a loss in resources and the speed in which you can make goblins means you can constantly be attacking.
Negative: It is very rare that you will gain trophies on a goblin raid. The goblins will skip normal buildings in their thirst for resources.
How to attack: Dump goblins in groups of 15-20 around the perimeter of the base. If you are trying for dark elixir wait until they are about to go after a wall before dropping your wall-breakers.
Barch Raid (preferred attack strategy until Gold 2)
Composition: 30% barbarians and 70% archers, add wall-breakers for dark elixir
When to use: Use Barch Raids to get a high amount of resources and a good chance of earning a small amount of trophies.
Positive: Cheap and quick. The barch raid will rarely yield a loss in either resources or trophies in the lower to mid levels. The barch army is also a quick army to build.
Negative: When you reach Gold 1 and above it will become increasingly difficult to gain trophies on raids.
How to attack: Draw a line of barbarians across one of the edges of the village. Select the archers and draw the same line. Continue this all the way around the base.
Archer Raid (preferred attack strategy for Gold 1 and up)
Composition: 100% archers
When to use: Use archer raids when you want a high percentage resource yield with an almost guaranteed chance of getting trophies.
Positive: Cheap and quick. Although the archer raid is double the cost of a goblin raid it is still a very cheap army to create and it can be created in a short amount of time. You are also almost guaranteed trophies on your attack.
Negative: Costs more than the barch or goblin raid and takes longer to create.
How to attack: Draw a line of archers across one of the edges of the village. Continue this all the way around the base. Reinforce areas that need it.
Traditional Raid (preferred attack strategy for getting dark elixir or trophies)
Composition: 15 giants, 1 healer, 8 wall-breakers, 10 wizards, 15 barbarians, 20 archers and 20 goblins
When to use: Use this raid only when you need to go deep inside a base for dark elixir.
Positive: This base has the potential of clearing a village but usually it is used to get deep inside a base to get to the dark elixir storage.
Negative: Can cost up to 100k elixir to create. Also takes a lot of time to cook wizards and healer.It will probably limit you to 1 attack per hour.
How to attack: Use your barbarians to pull CC troops if they are present. Try to aim your giants at an air defense so you can get your healer down as soon as possible. Once you have a few giants down start putting down wall-breakers and more giants. After they have penetrated a bit start unleashing your barbarians and archers while keeping to lead your giants through with the wall-breakers. Once the dark elixir storage area is reached unleash the goblins.
Sunday, July 27, 2014
Identifying Abandoned Villages
Many players have trouble getting the resources needed to fund building upgrades. It is quite simple to raise over 1 million resources per hour if you have the patience and knowledge to do so. the first part is being able to identify abandoned villages. With an abandoned village almost all of the resources are in mines and elixir collectors. This makes the resources easy to take from the village your attacking without the need of penetrating into the defending village.
Here are the major signs of an abandoned village.
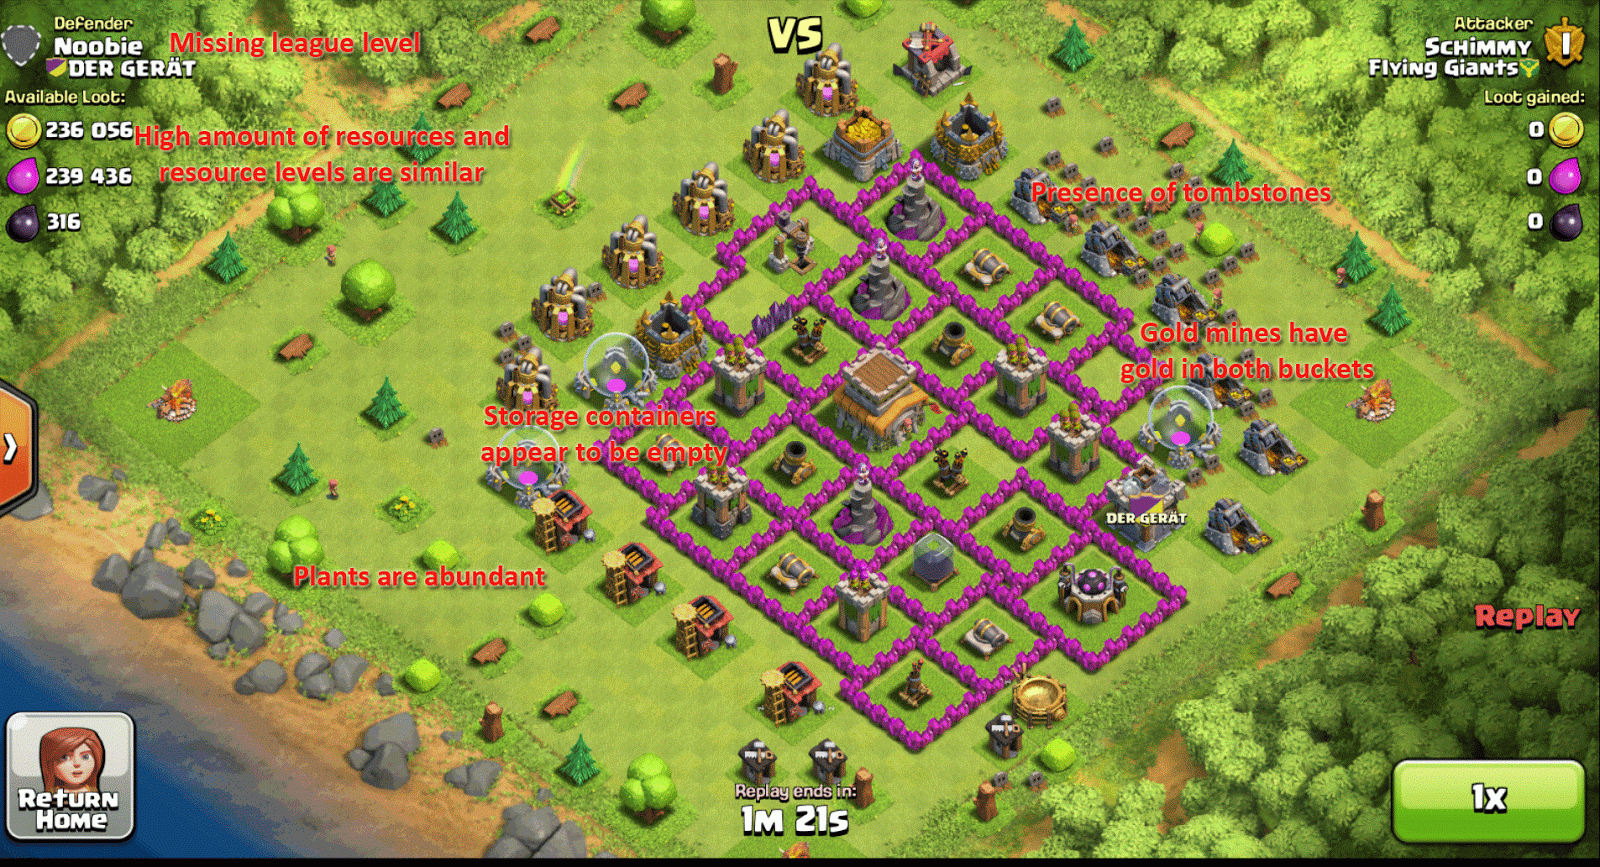
Here are the major signs of an abandoned village.
- Missing league rank
- A lot of resources
- Resource containers appear to be empty
- Resource levels are close to equal
- Both gold mine buckets are full
- There are tombstones all over the place
- There are a lot of obstacles
- No clan
- Builder huts are inactive
- Crossbow is not loaded
- Inferno tower isn't charged
In this picture you can see most of the signs that are needed to identify this village as abandoned.
To get the resources from an abandoned village all that you need to do is to unleash your barbarians and archers on each side and let them pillage away.
Saturday, July 19, 2014
When to Upgrade Your Town Hall
Having trouble figuring out the best time to upgrade your Town Hall? This simple guide will make it easier for you to make the decision.
Town Hall Levels 1 -2
During the first two levels it doesn't matter when you upgrade. Get your storage buildings upgraded then get your town hall to level 3 as quickly as you can.
Town Hall Levels 3 -4
At this level you need to make sure all of your buildings are built and your storage buildings are high. Once that is done focus on your laboratory. The lab is now your main focus, you need to keep it upgrading at all times. This is your first priority. You should upgrade your town hall when you get close to running out of things to upgrade in your lab.
Town Hall Levels 5-9
Your lab is still your first priority for upgrading but instead of upgrading your Town Hall based on lab upgrades, you now need to make sure you are close to maxing out all of your buildings before upgrading. Don't worry so much about maxing out your mines and elixir collectors, they are important but not crucial to your success in the upper levels.
Saturday, May 10, 2014
Upgrade Checklist
I created these lists to keep track of all of the upgrades that can be done at each level. This can help you in the planning of the development of your village.
Building Upgrade Checklist
Troop Upgrade Checklist
Building Upgrade Checklist
Troop Upgrade Checklist
Wednesday, April 23, 2014
Troop Comparison
I put together a cheat sheet so you can get a quick comparison between troops. There are some things to consider while looking at the chart. The value of a troop is determined by adding the dps/sp + hp/sp.
Troop Comparison Chart
Chart Definitions:
Space - How much troop space a unit occupies
HP - Hit Points the unit has
HP/SP - How many hit points the unit has divided by how many spaces it takes up
DPS - Single target damage per second
DPS/SP - Single target damage per second divided by how many spaces the unit takes up
Value - HP/SP + DPS/SP
Splash - If the unit damages everything in one area instead of just a single target
Flying - If the unit flies
Training - How long a unit takes to train
Speed - How fast a unit can move (higher is better)
Att Spd - Attack speed, how often does damage
Target
Notes
Troop Comparison Chart
Chart Definitions:
Space - How much troop space a unit occupies
HP - Hit Points the unit has
HP/SP - How many hit points the unit has divided by how many spaces it takes up
DPS - Single target damage per second
DPS/SP - Single target damage per second divided by how many spaces the unit takes up
Value - HP/SP + DPS/SP
Splash - If the unit damages everything in one area instead of just a single target
Flying - If the unit flies
Training - How long a unit takes to train
Speed - How fast a unit can move (higher is better)
Att Spd - Attack speed, how often does damage
Target
- G - Ground
- A - Air
- W - Wall
Notes
- The Witch's DPS does not factor in her skeletons
- The highlighted fields are the most for that area
- I included a DPS/space and HP/space to give a comparison of what you are getting per troop space
- I did not include a troops target preference
- DPS does not factor in splash damage
Subscribe to:
Comments (Atom)