As you ascend to the higher levels of TH9 and TH10 you will notice that it becomes harder and harder to 2 star, let alone 3 star a war base at your level. This guide will help you prepare your attack to maximize your chances at getting at least 2 stars on your attack.
Building Your Army
GoWiPe
2 Golems (60 units)
3 Pekkas (75 units)
2 Witches (24 units)
15 Wizards (60 units)
1 Archer (1 unit)
1 Healing Spell
2 Rage Spells
1 Jump Spell
GoWiWi
4 Golems (120 units)
4 Witches (48 units)
13 Wizards (52 units)
1 Healing Spell
2 Rage Spells
1 Jump Spell
The Drop
I prefer to attack from the side. If you wish to attack from the corner or if the base makes it more advantageous to attack from a corner then by all means do so. The side you should base your attack from is the side with the Archer Queen and hopefully opposite the Barbarian King and/or Clan Castle. The Archer Queen does a lot of damage and does not move a lot while protecting a base. I aim at her to get her dead while the healing spell is still active.
I like to have the Barbarian King and Clan Castle on the opposite side of the Town Hall because they tend to pull your troops toward them and if they are on the opposite side of the Town Hall, your troops will be sitting on the Town Hall when they are finished killing them.
You need to avoid attacking at an angle where the Archer Queen and Barbarian King are on either side of your drop spot. This will cause your troops to veer away from the Town Hall and likely end up giving you a 1 star attack instead of a 2.
Drop Order
Always drop the Golems first. They are fantastic meat shields and they go straight for the defensive structures in your enemy's base. Once the Golems are targeted drop your Wizards. The goal here is to knock down the first set of buildings so your Pekkas (for GoWiPe) will go toward the center. The other purpose off the Wizards is to blow away walls, Clan Castle troops, the Archer Queen and Barbarian King. the witches go last as they need the most protection and you want them targeted last.
Spells
The first spell you will use is the Healing Spell. After you drop your Wizards you will need to keep an eye on the Golems. If they start to take too much damage or if the Clan castle troops are deployed you will need to drop your Healing Spell. This will keep your Golems alive long enough for your Wizards to catch up and blast away your enemies.
Rage Spells should be used on two occasions. The first is when you encounter the Clan Castle troops and the second is when you engage the Town Hall. The Town Hall has the most hit points and needs to be knocked down as quickly as possible so your troops can go back to wiping the village.
The Jump Spell should be used to get your Golems into the area of the Town Hall. Usually the most dangerous defensive weapons are located in the center with the Town Hall. Giving your troops easy access to that area will ease the way into getting the Town Hall down faster.
Your Clan Castle Troops
Your first choice for CC troops is whatever someone can give you that is an upgrade over your troops. If you have someone in the clan with a higher level Golem then cook 7 more Wizards and 2 more Archers and put the higher level Golem in your CC. If no one in your clan has higher level troops than you do be courteous and ask for Wizards. If you are attacking with a GoWiPe/GoWiWi and your clan cannot provide you with Wizards then you are in the wrong clan.
Notes
I don't like using Wallbreakers. Wallbreakers have one purpose in life and then they are done. Many times they aren't even able to accomplish their one goal in life. If it is a choice between 8 Wallbreakers and 4 Wizards I would always choose the Wizards. 4 Wizards will end up knocking down more walls and will do a lot more damage along the way.
I don't pull the Clan Castle Troops. I see many attacks fail because they wasted 10 troops to pull the CC, and another 30 troops to kill the CC. You can accomplish the same thing with 1 Healing Spell. Just keep your Golems alive during the onslaught and you will have 10 more Wizards thrashing the village you are attacking than if you pulled their CC.
Good Luck!
Monday, March 16, 2015

Monday, March 9, 2015
TH9 War Base - Schimmy
This is the current war base that I am using for TH9. I have some moderate success with it and since my defensive buildings are getting stronger it is getting tougher for opponents to get two stars. Every two star attack I get is from someone with some very high level troops.
What makes this a good base?

What makes this a good base?
- Centralized Town Hall and Clan Castle.
- Centralized X Bows and Tesla's.
- Cannons have been moved toward the center to help knock off big troops for GoWiPe type of attacks.
- Bombs and traps are set in big groups to ensure hogs cannot take down your defenses.
- The Archer Queen and Barbarian King have been strategically placed to lure your attackers away from the Town Hall.
- Air Defense buildings are spread out to make sure spells cannot be used to take down all of the buildings.
- Paths have been created to send attacking ground troops around the base instead of towards the center.
TH9 Farming Base - Schimmy
This is the farming base I am currently using. My goals for the base are:

- Leave the Town Hall outside for cheap shields.
- Centralize the Clan castle.
- Protect the main storage buildings.
- Set the traps toward the outside of the base to try and stop the main forces from getting any depth.
- Double up Giant Bombs to prevent hog attacks.
- Place collectors close to the defense for maximum protection.
Thursday, August 14, 2014
TH7 Farming Base - Seth
Credit for this base goes to Seth from the clan Youngwild&Free. I saw this base and I thought it had enough merit to put it up on the blog. Seth had a barbarian king in his arsenal which is substituted for one of the collectors or mines. You can switch it for an inner canon if you want to use it for defense.
As usual the base has the clan castle in its center and a nice triangulation of mortars. Like all good farming bases the Town Hall is placed well outside the normal base to get free 12 hour shields. I did adjust the archer towers to give the base a better chance of holding off air attacks.
The traps in this base are in obvious locations so the seasoned vet will try to plow through the wall with wall breakers, only to find a bunch of bombs waiting. The most important part of this base is of course the central location of all of the storage buildings. This base should give you ample protection against attacks your level.

As usual the base has the clan castle in its center and a nice triangulation of mortars. Like all good farming bases the Town Hall is placed well outside the normal base to get free 12 hour shields. I did adjust the archer towers to give the base a better chance of holding off air attacks.
The traps in this base are in obvious locations so the seasoned vet will try to plow through the wall with wall breakers, only to find a bunch of bombs waiting. The most important part of this base is of course the central location of all of the storage buildings. This base should give you ample protection against attacks your level.
Thursday, August 7, 2014
TH8 Farming Base - Flying Giants
This design is based on the previous series of Flying Giants bases. Like the previous bases in this series it has some vulnerability to resource lost but it will come at a high cost as all resource collectors and storage are well protected. The mortars and air defense are in a standard triangle pattern. The clan castle is put in the center with the dark elixir storage to provide maximum protection for your dark elixir.
Attacks leading with giants will go down quickly as they will go for the quick open kill of defensive buildings in the corners. The giants surviving the spring trap will be punished with a giant bomb and a tesla in addition to the other defensive buildings in the surroundings.

Attacks leading with giants will go down quickly as they will go for the quick open kill of defensive buildings in the corners. The giants surviving the spring trap will be punished with a giant bomb and a tesla in addition to the other defensive buildings in the surroundings.
Wednesday, August 6, 2014
The Best Guide I have found - Flammy's Strategy Guide
I have been thinking about writing a guide for a while now, but I came across this guide. It has everything you could possibly want to know about CoC. It even shows you how all of the different troops tend to path and explains why they path the way they do.
So what are you waiting for? Check it out.
Flammy's Strategy Guide
So what are you waiting for? Check it out.
Flammy's Strategy Guide
Friday, August 1, 2014
Raiding
There are different purposes for raiding. the main reason for raiding is of course to acquire resources. You can also raid to do gain trophies to move up in leagues. The purpose of this article is to help you create an army that will get the resources you want.
Resource Location
One of the most important parts of raiding is understanding where the resources are. Here is a chart that shows where to find your resources and how much you can get from them.
As you can see the highest level of loot is from the collectors, which fortunately for the raider are usually located outside of the village walls. The first thing you need to do is to see if there are any resources located in the collectors. I have created an article labelled Identifying Abandoned Villages to aid you in this endeavor.
Tips and Tricks
Goblin Raid
Composition: 100% goblins or 8 to 10 wall-breakers and the rest goblins.
When to use: Use a goblin raid if you only care about resources. Add wall-breakers if you want to go deeper into the base to attempt to get dark elixir.
Positive: Cheap and quick. The goblin army will rarely net you a loss in resources and the speed in which you can make goblins means you can constantly be attacking.
Negative: It is very rare that you will gain trophies on a goblin raid. The goblins will skip normal buildings in their thirst for resources.
How to attack: Dump goblins in groups of 15-20 around the perimeter of the base. If you are trying for dark elixir wait until they are about to go after a wall before dropping your wall-breakers.
Barch Raid (preferred attack strategy until Gold 2)
Composition: 30% barbarians and 70% archers, add wall-breakers for dark elixir
When to use: Use Barch Raids to get a high amount of resources and a good chance of earning a small amount of trophies.
Positive: Cheap and quick. The barch raid will rarely yield a loss in either resources or trophies in the lower to mid levels. The barch army is also a quick army to build.
Negative: When you reach Gold 1 and above it will become increasingly difficult to gain trophies on raids.
How to attack: Draw a line of barbarians across one of the edges of the village. Select the archers and draw the same line. Continue this all the way around the base.
Archer Raid (preferred attack strategy for Gold 1 and up)
Composition: 100% archers
When to use: Use archer raids when you want a high percentage resource yield with an almost guaranteed chance of getting trophies.
Positive: Cheap and quick. Although the archer raid is double the cost of a goblin raid it is still a very cheap army to create and it can be created in a short amount of time. You are also almost guaranteed trophies on your attack.
Negative: Costs more than the barch or goblin raid and takes longer to create.
How to attack: Draw a line of archers across one of the edges of the village. Continue this all the way around the base. Reinforce areas that need it.
Traditional Raid (preferred attack strategy for getting dark elixir or trophies)
Composition: 15 giants, 1 healer, 8 wall-breakers, 10 wizards, 15 barbarians, 20 archers and 20 goblins
When to use: Use this raid only when you need to go deep inside a base for dark elixir.
Positive: This base has the potential of clearing a village but usually it is used to get deep inside a base to get to the dark elixir storage.
Negative: Can cost up to 100k elixir to create. Also takes a lot of time to cook wizards and healer.It will probably limit you to 1 attack per hour.
How to attack: Use your barbarians to pull CC troops if they are present. Try to aim your giants at an air defense so you can get your healer down as soon as possible. Once you have a few giants down start putting down wall-breakers and more giants. After they have penetrated a bit start unleashing your barbarians and archers while keeping to lead your giants through with the wall-breakers. Once the dark elixir storage area is reached unleash the goblins.
Resource Location
One of the most important parts of raiding is understanding where the resources are. Here is a chart that shows where to find your resources and how much you can get from them.
| Building Type | Gold/Elixir | Dark Elixir |
|---|---|---|
| Town Hall | You can steal 100% of the loot for a max of 1000 | Not available |
| Storage | You can steal 20% - 2% per TH level past 5, Cap is 200k plus 50k for every level past TH5 | You can steal 6% - 1% per TH level past 8, Cap is 2000 plus 500 for every level past TH8 |
| Collectors/Mines | You can steal 50%, Cap is the storage capacity | You can steal 75%, Cap is the storage capacity |
| Clan Castle | You can steal 10% - 1% per TH level past TH5, Cap is the storage capacity of the Clan Castle | You can steal 7% - 1% per TH level past TH8, Cap is the storage capacity of the Clan Castle |
As you can see the highest level of loot is from the collectors, which fortunately for the raider are usually located outside of the village walls. The first thing you need to do is to see if there are any resources located in the collectors. I have created an article labelled Identifying Abandoned Villages to aid you in this endeavor.
Tips and Tricks
- Check town hall placement first. If it is a farming base with a town hall in a corner attack it but use only 4 troops unless it is also an abandoned village.
- Check the amount of resources that can be looted and make sure it is an abandoned village. If not move on.
- Don't worry about the amount of gold it takes to find the right base to attack. In the law of averages you will gain a lot more than you spend if you just keep searching for the right base.
- Don't use all of your troops if you don't need them. If you get your resources and go over 50% of the village destroyed there is no need to drop any more troops.
- Don't use spells when you are farming for resources unless you think you will gain more than you are spending by a lot.
- Start off your attack by hitting the corners. Sometimes they will give you the added percentage you need to get a few trophies.
Goblin Raid
Composition: 100% goblins or 8 to 10 wall-breakers and the rest goblins.
When to use: Use a goblin raid if you only care about resources. Add wall-breakers if you want to go deeper into the base to attempt to get dark elixir.
Positive: Cheap and quick. The goblin army will rarely net you a loss in resources and the speed in which you can make goblins means you can constantly be attacking.
Negative: It is very rare that you will gain trophies on a goblin raid. The goblins will skip normal buildings in their thirst for resources.
How to attack: Dump goblins in groups of 15-20 around the perimeter of the base. If you are trying for dark elixir wait until they are about to go after a wall before dropping your wall-breakers.
Barch Raid (preferred attack strategy until Gold 2)
Composition: 30% barbarians and 70% archers, add wall-breakers for dark elixir
When to use: Use Barch Raids to get a high amount of resources and a good chance of earning a small amount of trophies.
Positive: Cheap and quick. The barch raid will rarely yield a loss in either resources or trophies in the lower to mid levels. The barch army is also a quick army to build.
Negative: When you reach Gold 1 and above it will become increasingly difficult to gain trophies on raids.
How to attack: Draw a line of barbarians across one of the edges of the village. Select the archers and draw the same line. Continue this all the way around the base.
Archer Raid (preferred attack strategy for Gold 1 and up)
Composition: 100% archers
When to use: Use archer raids when you want a high percentage resource yield with an almost guaranteed chance of getting trophies.
Positive: Cheap and quick. Although the archer raid is double the cost of a goblin raid it is still a very cheap army to create and it can be created in a short amount of time. You are also almost guaranteed trophies on your attack.
Negative: Costs more than the barch or goblin raid and takes longer to create.
How to attack: Draw a line of archers across one of the edges of the village. Continue this all the way around the base. Reinforce areas that need it.
Traditional Raid (preferred attack strategy for getting dark elixir or trophies)
Composition: 15 giants, 1 healer, 8 wall-breakers, 10 wizards, 15 barbarians, 20 archers and 20 goblins
When to use: Use this raid only when you need to go deep inside a base for dark elixir.
Positive: This base has the potential of clearing a village but usually it is used to get deep inside a base to get to the dark elixir storage.
Negative: Can cost up to 100k elixir to create. Also takes a lot of time to cook wizards and healer.It will probably limit you to 1 attack per hour.
How to attack: Use your barbarians to pull CC troops if they are present. Try to aim your giants at an air defense so you can get your healer down as soon as possible. Once you have a few giants down start putting down wall-breakers and more giants. After they have penetrated a bit start unleashing your barbarians and archers while keeping to lead your giants through with the wall-breakers. Once the dark elixir storage area is reached unleash the goblins.
Sunday, July 27, 2014
Identifying Abandoned Villages
Many players have trouble getting the resources needed to fund building upgrades. It is quite simple to raise over 1 million resources per hour if you have the patience and knowledge to do so. the first part is being able to identify abandoned villages. With an abandoned village almost all of the resources are in mines and elixir collectors. This makes the resources easy to take from the village your attacking without the need of penetrating into the defending village.
Here are the major signs of an abandoned village.
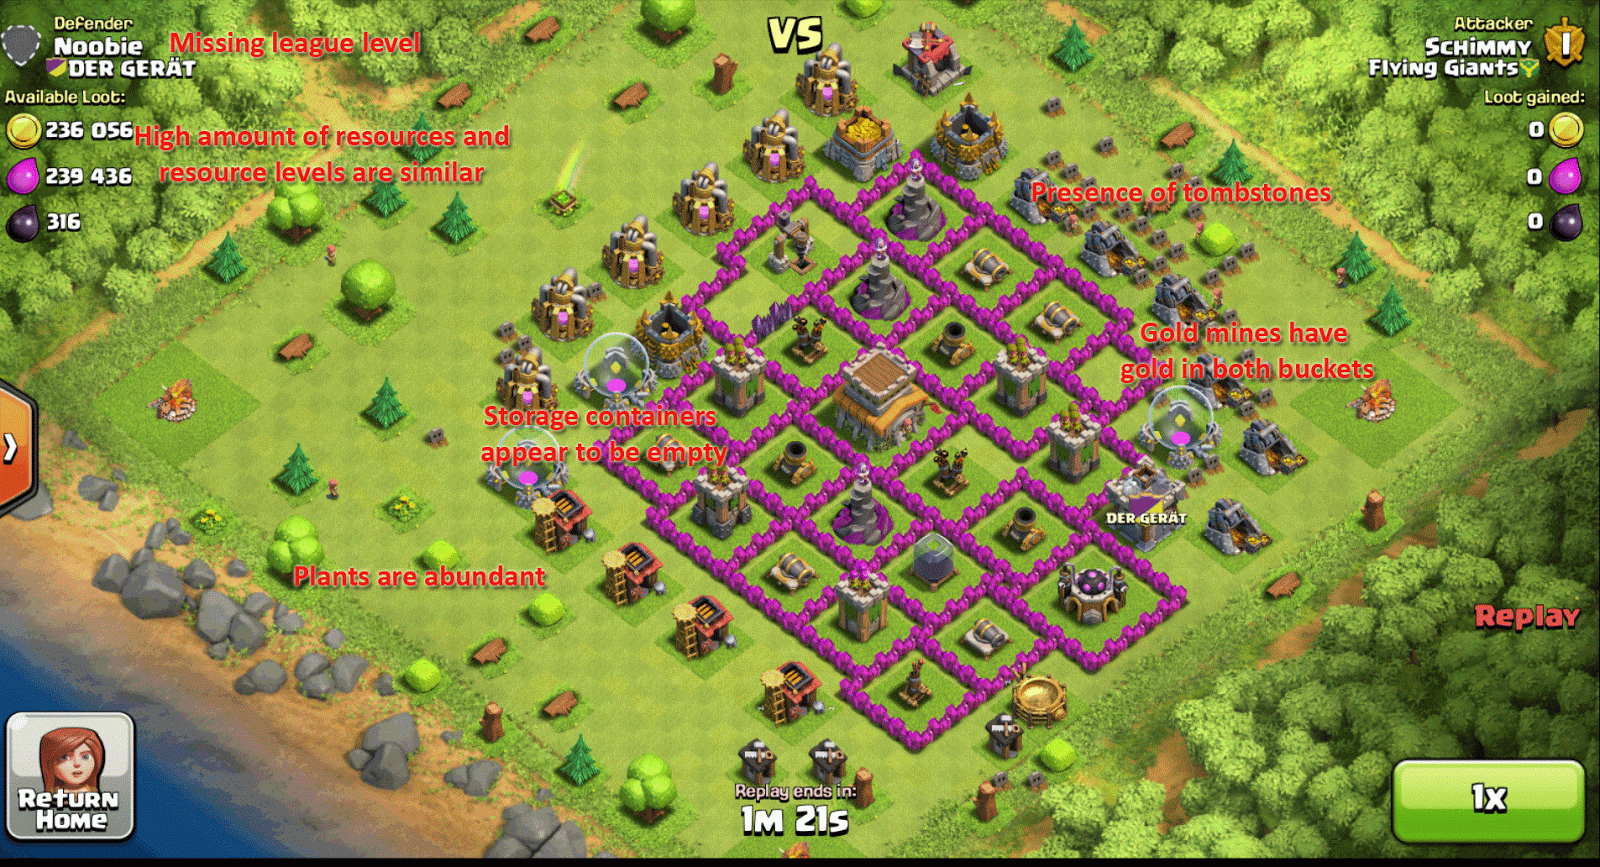
Here are the major signs of an abandoned village.
- Missing league rank
- A lot of resources
- Resource containers appear to be empty
- Resource levels are close to equal
- Both gold mine buckets are full
- There are tombstones all over the place
- There are a lot of obstacles
- No clan
- Builder huts are inactive
- Crossbow is not loaded
- Inferno tower isn't charged
In this picture you can see most of the signs that are needed to identify this village as abandoned.
To get the resources from an abandoned village all that you need to do is to unleash your barbarians and archers on each side and let them pillage away.
Saturday, July 26, 2014
TH8 - Anti-hog/dragon War Base
I present to you the anti-hog/dragon war base design. This is a variation of a base that I found on the internet that I believe have improved on. The most common attack on a TH8 base are Hog Riders and Dragon attacks. This base is designed to defend against both.
Notice how the bombs are clustered together. One small bomb on its own doesn't do a lot of damage especially when the attacking army has a healer in the raiding party but when you cluster bombs together they are usually able to kill the attackers even through a healers healing powers. The damage accumulates so fast the healer doesn't have a chance to heal the damage that was done.
Air Defenses are located behind the second wall making the tougher for your attackers to get at. Therefore your attacker either has to spend more on ground troops to get to Air Defense (AD) or attack you with very high level air attackers that can soak up the damage. The AD is placed in a triangular pattern so that if one AD is being attached the other can reach the attacking troop.
If you have questions or comments please leave them in comments section or hit me up in clan chat.

TH8 War Base - Schimmy
I wanted to create a TH8 War Base with the following elements:

- Inner triangulation of mortars and air defense
- Centralized town hall and clan castle
- Outer layer of giant funneling with traps
- A ring of archer towers, teslas, and wizard towers to help prevent air attacks
Many of the attacks against town hall 8 and up are air attacks, either balloons or dragons. By creating an inner ring of air defense it is difficult to disable the air defense without a great troop investment forcing your attacker to go all air or all ground.
If the attacker goes all air there will be little resistance until the troops reach the second ring of defense. The likelihood that their troops will survive as all of your air defense will work together to thwart your attackers.
If the attacker goes ground giants will start flying and PEKKA will be greeted with teslas minimizing their abilities to get very far.
Thursday, July 24, 2014

TH8 Farming Base - Balance
The idea of this farming base design is balanced defense and balanced resources layout. It is compartmentalized to make it difficult to get far into the base without have to sacrifice a lot of troops.
Again the BK and Clan Castle are central to the design and in the middle of all of the resource storage tanks.

TH8 Farming Base - Typhoon
Much like the "TH8 Farming Base-Schimmy" this base is designed to funnel Giants around the core of the base and make them fly. Even if your would be attacker uses Wall Breakers on your outside wall the Giants will still be force around in a circle. The Clan Castle is pretty much dead center in the middle of the base. This is important because it is your most valuable defensive structure in a farming base. Always make sure to request troops for it before you log off no matter what base design you decide you to use.
Make sure to rotate in and out of the center your most valuable resources that you are trying to accumulate for that next upgrade.

Saturday, July 19, 2014
When to Upgrade Your Town Hall
Having trouble figuring out the best time to upgrade your Town Hall? This simple guide will make it easier for you to make the decision.
Town Hall Levels 1 -2
During the first two levels it doesn't matter when you upgrade. Get your storage buildings upgraded then get your town hall to level 3 as quickly as you can.
Town Hall Levels 3 -4
At this level you need to make sure all of your buildings are built and your storage buildings are high. Once that is done focus on your laboratory. The lab is now your main focus, you need to keep it upgrading at all times. This is your first priority. You should upgrade your town hall when you get close to running out of things to upgrade in your lab.
Town Hall Levels 5-9
Your lab is still your first priority for upgrading but instead of upgrading your Town Hall based on lab upgrades, you now need to make sure you are close to maxing out all of your buildings before upgrading. Don't worry so much about maxing out your mines and elixir collectors, they are important but not crucial to your success in the upper levels.
Wednesday, July 16, 2014
TH7 War Base - Pink Mist
This is a variation on the ball that is used frequently in TH8 bases. The base uses forced paths at the outer level to force your attackers giants into springs. If your attacker manages to make it past the outer levels they are forced into the center where they will be greeted by 2 teslas and some major explosions. Getting 1 star from this base is possible but getting 3 will be very difficult.
.gif)
Saturday, July 12, 2014
TH6 War Base - Flying Giants
This base has worked really well for me through two accounts. Although it looks very simple the giants are forced into a path of destruction.

Wednesday, July 2, 2014
TH7 War Base - Jon
Is farming season over and you are ready make a move up the trophy ladder? Are you looking for a solid Clan War base?
In the image below you will see the base layout intended for use in Clan Wars. You can tell that this is a Clan War base because all of the structures are spread out to make it difficult to pull the Clan Castle troops. This base works well for a few different reasons:
- It is harder for the attacker to aim their wall breakers at the spots they want them to go.
- Wall breakers have a tendency to head for the corners of the walls.
- Long straight walls make it easier for an attacker to aim WBers.
- There are multiple layers of defenses to get through in order to get to the mortars and air defenses.
- This design takes advantage of all the resource structures having to be attacked first by ground attacks.
- Your defenses can kill a lot of troops before they even get to your walls.

NOTE: This design is missing two structures. The Barbarian King and the Dark Elixir Barracks.
If you want to use this design for Trophies make sure you bring your resource structures closer to your walls so that they are better protected to make it harder for the attackers to get one star.
TH7 Farming Base - Jon
This base is designed for the free give away of your Town Hall in exchange for a 12 hour shield. The Town Hall is strategically placed out of the range of all defense structures.
If your attacker really wants to get at your resources this base design will make them work for it. All four sides of the base have a wall opening with a spring trap at the openings to make Giants Fly. Each one of the openings is also protected by either a cannon or wizard tower. Making anything that happens to make it through the spring trap be a target for at least three other defense structures.

Note: This design is missing two structures. The Barbarian King and Dark Elixir Barracks.
The BK structure should be located where the Spell factory is currently shown. The spell factory can move to the left hand side by camp and barracks. The DE barracks can be located on the right hand side by the barracks and camp.
Sunday, June 29, 2014
TH4 War Base - Flying Barbarians
Here is a design for a level 4 town hall that you can use for clan wars. This design is very simple but effective. Ignore the level of the buildings, I designed this with my current village.
the main part of any war base is the town hall and clan castle. In this design they are both exactly where they need to be, in the center. The mortar and wizard tower are put together for maximum protection for each other. The air defenses are spread out all over to prevent balloon attacks and healers.
The spring traps are conveniently located to make giants fly. By putting a path on the outer level of the base the giants will follow the route and start flying.
The storage units don't factor into clan wars so you can put them anywhere. The main idea of the outside buildings is to make it hard for your attacker to pull your clan castle troops out. Leave them spread out for clan wars. They may get 1 star from you but it will be very hard for anyone to get more than 1 if they are near your level.

the main part of any war base is the town hall and clan castle. In this design they are both exactly where they need to be, in the center. The mortar and wizard tower are put together for maximum protection for each other. The air defenses are spread out all over to prevent balloon attacks and healers.
The spring traps are conveniently located to make giants fly. By putting a path on the outer level of the base the giants will follow the route and start flying.
The storage units don't factor into clan wars so you can put them anywhere. The main idea of the outside buildings is to make it hard for your attacker to pull your clan castle troops out. Leave them spread out for clan wars. They may get 1 star from you but it will be very hard for anyone to get more than 1 if they are near your level.
Friday, June 20, 2014
TH8 Farming Base - Schimmy
This base is an all around good design that has my favorite element, making giants fly. Starting in the center you will see that your most important defense, your Clan Castle, is well protected. I always keep archers in there as they can kill almost anything that your attacker can throw at you. the next thing to look for is the mortars. In this base the mortars are evenly spaced and cover almost the entire base.
Surrounding the mortars are all of your resource storage. This combined with an outer layer of really good trapping and troop funneling and your attack will have to pay dearly for any resources taken from you.

Surrounding the mortars are all of your resource storage. This combined with an outer layer of really good trapping and troop funneling and your attack will have to pay dearly for any resources taken from you.
Subscribe to:
Posts (Atom)